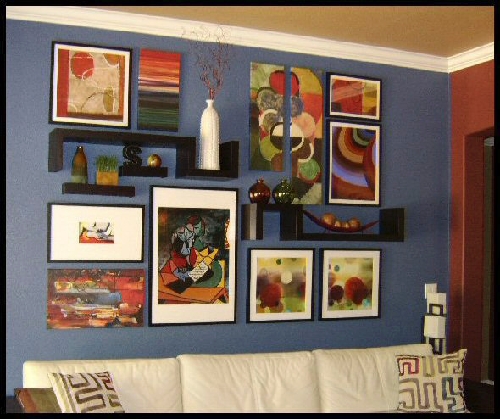
Wall gallery makes dramatic impact

I get a lot of questions about wall galleries. Many people have small pieces of artwork and just don’t know how to pull them all together. I love wall galleries as they can make such an impact if done right.
Depending upon what the images are determines where you may put them. I personally like family photographs lower at eye level as I want to be able to get close enough to see them; art images can go higher.
Recently I did a very large gallery over a sofa in a living room. My client wanted a dramatic and colorful impact as it was the first thing that you saw when coming in the house. It was probably the most challenging but also the most fun one I’ve done. She wanted it to be somewhat symmetrical versus a random placement of the images. Plus, we wanted to keep it affordable.
So I thought I’d walk you through the steps I took to put it together. I will say it took a lot of hours to complete, many more than I thought, but it was well worth it in the end. Here’s what I did.
First, I drafted out the area, which was 110 inches wide by 80 inches high, in one-half-inch scale and came up with a few different layouts to make sure we were both on the same path. I knew in advance that I wanted to use a combination of framed images, canvases, shelves and accessories. Since the area was so large, I wanted to add some dimension, which the shelves and accessories would give me.
Next, I searched for images for her to select from. I gave her more than 40 images to go through and had her rate them want, like and don’t like. I did this so that I would have plenty to select from to make them work in the gallery. I felt it was important that she liked the images, since I could adjust the layout to make them work.
Since we wanted to keep it affordable, I went to see what ready-made frame sizes I could get. Then, I checked which images would fit into them, knowing that I could matt them to fit. I did have all of the posters professionally mounted and matted.
The next step was to decide which images I would transfer to canvas. In the accompanying photo you’ll notice two canvases in the upper right side that are different lengths and what we call a diptych, two images that when placed side-by-side form one image. I wanted to do something different so I had two canvases made from the same image, then wrapped and separated them from each other on the wall.
Now here’s where it got tricky and time consuming. I wanted to make sure everything would lay out perfect and that she could also see it before we purchased anything. I laid out the whole gallery, to one-half-inch scale, using Paint Shop Pro. I knew I’d have to crop some of the images to fit the frames as well as the canvases. I needed to see how much mat board we’d have, how the shelves would fit in and what size and type of accessories I’d need. I also needed to know what images I’d turn in a different direction to work, which being abstract images I could get away with. Yes, it was crazy; but for me also necessary.
With that done, I had my client sign off on it. My framer knew exactly where to crop the images and where to wrap the canvases, and my art installer knew exactly how much room I wanted between each piece.
So how much did it all cost, taking advantage of sales? Posters, $350. Frames, $200. Mounting, $225. Canvases, $500. Shelves, $155. Accessories, $45. Installation, $250. This brought my total to $1,7250 for a wall gallery more than 9 feet long by 6½ feet high that they’ll get to enjoy for a long time.
If you’d like to see all of the pictures, go to my Web site, www.GMJinteriors.com and enter Aaron Brothers in the search box.
Gail Mayhugh, owner of GMJ Interiors, is a professional interior designer and author of a book on the subject. Questions may be sent by e-mail to: gail@gmjinteriors.com. Or, mail to: 7380 S. Eastern Ave., No. 124-272, Las Vegas, NV 89123. Her Web address is: www.GMJinteriors.com.