Mid-priced body shower units are easiest to install


Q: We have a boring shower and we want to upgrade it. Right now, it is standard size with ceramic tile walls. We found a body shower unit that has various spray heads on it, and it looks like just the one we want. I have some plumbing experience and am wondering if I am up to the task.
A: It sounds like you take showering seriously. I have a friend who actually takes three showers a day. I’m sure he has some psychological problems, but it’s equally likely that soap manufacturers thank him. After you start using the body shower, you might be showering just as often.
A body shower has multiple jets that spray on you as you bathe. Some jets have pulsating heads that will give you a gentle massage as you shower. Low-end models simply just tee off of the shower neck, and it looks poor as the piping is exposed to the two spray jets. Mid-priced units are the most popular as they come in a unit that mounts on the wall.
You can also custom-build a body shower, but you need to open the walls and run the rough plumbing, as well as add an electrical supply since these typically have pumps.
Since the mid-priced unit is the most popular, I will focus on it. First, remove the escutcheon plate to make sure you have enough space in the cavity of the shower wall.
Also, use a water pressure gauge to test your water pressure. You can buy one for less than $10 and screw it onto the hose bib. Turn the hose faucet on and read the gauge. Check the manufacturer’s specifications for minimum acceptable water pressure, but it is usually 45 psi.
To start the installation, turn the water off to the house. Go to the shower and open the shower valve to relieve the water pressure.
You are going to remove the shower valve inside the wall, but it’s not as tricky as you might think. You can heat up the fittings with a torch and remove them, but since the area will be very cramped, I would cut the key parts away with a pipe-cutting tool.
You first want to remove the shower arm and riser (some units have you connect an elbow in place of the shower arm to supply water to the unit). This will be the pipe coming out of the top of the valve. You can cut this pipe first and then unscrew the shower arm.
To remove the shower valve, cut the hot or cold line and then unscrew the valve. This will make it so you only have to replace one male fitting on the pipe that you cut. If space is tight, you can use a compression fitting instead of sweating a fitting on with a torch.
You may have to install various adapters for the plumbing connections, but what you will be left with are two male adapters, each on the end of the hot and cold supply pipes. You also may need to replace the tile where the shower arm was if the unit won’t cover the hole.
Next, get ready to hang the body shower. Measure for the dimensions of the installation and drill through the tile. Use a tile bit and burrow a hole through the tile.
Install the anchors, but apply some silicone around them first to keep out any water. Push the anchor into the hole and then screw the screw into the anchor. This will cause the anchor to expand and the screw will go into it.
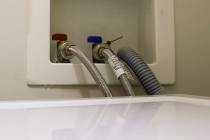
Install the braided-steel water lines to the adapters and then to the body shower using Teflon tape.
The body shower mounts from the top and bottom, then has two mounting positions near the valve handle. Place the shower over the bolts and tighten down the nuts. The perimeter of the unit has a gel-like substance so as you tighten the nuts, the gel compresses to keep out any water.
Attach the hand sprayer and the rest of the water jets (they just slip together). The last step is to install the decorative covers over the jets. These units have an anti-scald feature, and the instructions will tell how to operate and adjust the valve. Lastly, screw the handle to the unit with a set screw.
The body shower can operate as a regular shower, or you can turn the handle a little farther and the body jets will turn on and drench you.
Mike Klimek is a licensed contractor and owner of Las Vegas Handyman. Questions may be sent by email to handymanoflasvegas@msn.com. Or, mail to 4710 W. Dewey Drive, No. 100, Las Vegas, NV 89118. His web address is www.handymanoflasvegas.com.
Do-it-yourself
Project: Install a body shower unit
Cost: From around $400
Time: About 1 day
Difficulty: ★★★★★